INTERACTIVE DESIGN - Exercises
27/08/19 – 08/10/19 (Week 1 – Week 7)
Arletta Leviani (0337751)
Interactive Design
Exercises
LECTURE NOTES
Lecture 127/08/19 (week 1)
Today is our first day of our Interactive Design class and we meet with Mr Shamsul again. He briefed us quickly about what we about to do this semester. He talk about our MIB and after everything settled, we are starting our exercise.
Lecture 2
03/09/19 (week 2)
On our second week, we are discussing about 'Norman Door' from a Youtube video by Vox.
The video descried how there are times when we miss use a door by pushing instead of pulling. This phenomenon was described as the 'Norman Door' by Don Norman. He said that people should have know what they supposed to do when given an object with no instruction. For example, a door with only no handle in one side, you automatically know that you need to push.
Don Norman says that designers can avoid these scenario like the 'Norman Door' with a good design, but they need a few steps to achieved a good design that can be use effectively. The steps are:
- Observation
- Idea Generation
- Prototyping
- Testing
Lecture 4
17/09/19 (week 4)
Today our class started with feedback for our project 1 on the first 2 hours. We then continue with html. We learn through notepad on our computer and try to follow Mr Shamsul directions.
- <html>
- <head>
- <title>
- <body>
- <p>: paragraph
- <h1> <h2><h3> <h4> <h5> <h6>: header
- <ol>: ordered list
- <ul>: un-ordered list
- <img src=>: adding images
- <!-- -->: comment
- <hr>: adding a line
- <br>: skip a line / 'enter'
Lecture 5
24/09/19 (week 5)
Today we start to learn about html and tried using them with the html we made from the notepad. We put decorations such as colors.
24/09/19 (week 5)
Today we start to learn about html and tried using them with the html we made from the notepad. We put decorations such as colors.
 |
| Fig 1.1 Block elements |
 |
| Fig 1.2 Inline elements |
Lecture 6
01/10/19 (week 6)
This week we learn about min-height and min-width. They were use when a website is open from another device other than laptop such as tablet, phone and ect. The minimum height will also stretch based on the information or images put inside the id.
After the lecture ends we start to practice using our old html that we made in notepad. We start to learn how to put styles and id with guidance. Then we start to use CSS to put our styles there to make the html clean and easier to read.
Lecture 7
08/10/19 (week 7)
No lecture this week.
INTRODUCTION
EXERCISE
Web Evaluation and Critics (week 1)For our first class, we are getting our first exercise, we are told to search for a 3 good website and 3 bad website. We are only allowed to find our website from a link that provided by Mr Shamsul.
We are divided into 4 groups to find these websites. We make a google sheet so the group member can put their website easier. This is my group findings.
We are told that most of our websites are correct, but he also told us that we need to find a website that user will try to open again, not just a one time view only.
Evaluating Website (week 2)
Today we are divided again into 4 groups to make a website prototype. We are given A4 papers that we can use for our prototype. In the prototype, we need to give a specific task for our user, our group choose a task to go to the university library. The reason is because it is on the second level of the campus, so we can make a direction to go there.
 |
| Fig 2.1.1 Web Prototype 1 |
 |
| Fig 2.1.2 Web Prototype 2 |
 |
| Fig 2.1.3 Web Prototype 3 |
 |
| Fig 2.1.4 Web Prototype 4 |
 |
| Fig 2.1.5 Web Prototype 5 |
 |
| Fig 2.1.6 Web Prototype 6 |
 |
| Fig 2.1.7 Web Prototype 7 |
User Interface (week 3)
https://arlettadesignjournal.blogspot.com/2019/09/project-1-interactive-design.html
Type for Screen Design (week 4)
For this week exercise we are told to make our own html by using all the this Mr Shamsul has told us during class. This is what I made.
Imaging for Web Design styling the web (week 5)
We start to decorate our blog with colors, putting margins and overall learn the basic of html. We practice using the html we made on notepad, paste everything to Adobe Dreamweaver. These are all my practice coding progression.
 |
| Fig 3.1.1 practice 1 |
 |
| Fig 3.1.2 practice 2 |
 |
| Fig 3.1.3 practice 3 |
 |
| Fig 3.1.4 practice 4 |
https://monitorial-wires.000webhostapp.com/index.html
Language of the Web part 1 (week 6-7)
This week we learn about id and class. We learn using CSS and link them to our html file, float and using styles. We start to practice a basic web design and how to design them. This is our practice with guidance.
 |
| Fig 4.1.1 Practice 1 |
 |
| Fig 4.1.2 Practice 2 |
This is the css file that is linked for the styles.
 |
| Fig 4.2.1 CSS1 |
 |
| Fig 4.2.2 CSS2 |
| Fig 4.2.3 CSS3 |
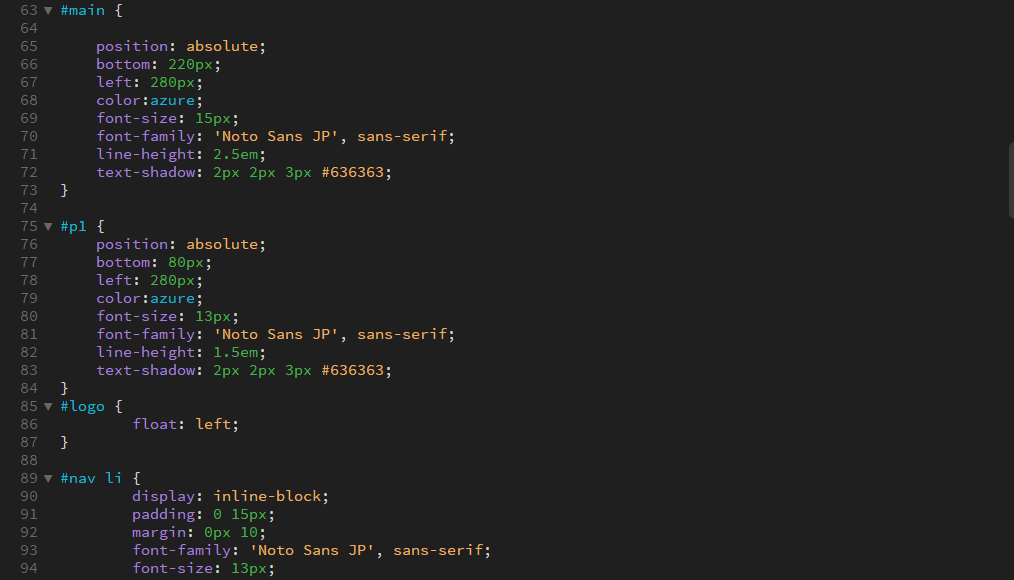
After we learn all these, we start designing our own web using all the knowledge we learn with html, css, and dreamweaver. We can copy an existing web that provided by Mr Shamsul or we can make it on my own. I decide to make on my own. This is the code I made to make this web.
 |
| Fig 4.3.1 HTML 1 |
 |
| Fig 4.3.2 HTML 2 |
 |
| Fig 4.3.3 HTML 3 |
 |
| Fig 4.3.4 HTML 4 |
 |
| Fig 4.4.1 CSS 1 |
 |
| Fig 4.4.2 CSS 2 |
 |
| Fig 4.4.3 CSS 3 |
 |
| Fig 4.4.4 CSS 4 |
 |
| Fig 4.4.5 CSS 5 |
 |
| Fig 4.4.6 CSS 6 |
 |
| Fig 4.4.7 CSS 7 |
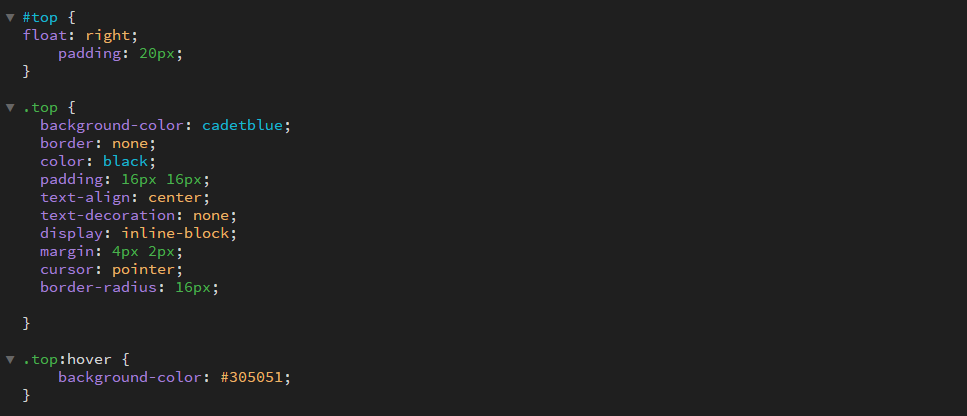 |
| Fig 4.4.8 CSS 8 |
https://arlettaleviani.000webhostapp.com/index.html
FEEDBACK
Week 1We were told that we need to be careful when picking a good website. We were told that we need to make sure the website is something that we going to visit again, not only once. Make sure we know the landing page and the call of action in the website as well.
Week 2
We were told our prototype was good.
Week 5
No exercise, I didn't get any feedback.
Week 6
No exercise, I didn't get any feedback. We are only told to start to do our own html files for photoshop web.
Week 7
I was told that my work is good, need to fix padding since each section is too far from each other. After that's fixed, I got an ok.
REFLECTION
Experience
Week 1
This is the first class of interactive design. I was exposed to a good web design and not so good web design. An animated or a good color scheme doesn't make a good website, but a website with good call to action and a site that people can visits again and again.
This is the first class of interactive design. I was exposed to a good web design and not so good web design. An animated or a good color scheme doesn't make a good website, but a website with good call to action and a site that people can visits again and again.
Week 2
I was making prototype with papers, it was easier to make the elements when we are thinking from the viewer perspective. We really tried to make little things like keyboards, search button, and the exit button to make it easy for user.
Week 5
It is quite hard for me to remember all the tools before when we didn't use Adobe Dreamweaver. I also have a lot of problem following since all the keys or words are new to me. I manage to follow along to understand quite bit.
Week 6-7
During the 2 weeks of doing this exercise, I notice that it's better for me to try on my own first rather than following along. I start to understand the keywords and understand how it works. I manage to finish at home and only have only minor changes.
Observation
Week 1
I noticed that I was confused which ones is good and not, but after being exposed for a while, I can see the differences. I manage to see how to make a website by thinking for the user experiences.
I noticed that I was confused which ones is good and not, but after being exposed for a while, I can see the differences. I manage to see how to make a website by thinking for the user experiences.
Week 2
When we first started we don't really think of the user objective, it was really hard to think of what we should do next. But then we think of the objective and it is really easy to think what we should make and add.
Week 5
When looking at the projection screen, it is really hard to see the little words, especially when you are not familiar with the words. It is because of the black background as well. I eventually move place so I can see better because I can't follow along.
Week 6-7
I notice that when I learn faster when I try on my own, even when I am quite slow at first. I manage to make a good enough site that only need minor changes. I also need to be careful of the min-height and set it correctly.
Finding
Week 1
I find that good color schemes or animations is not important when making good website. The one that matter is when the landing page have a good call to action purposes.
Week 2
I find that making the objective first is making our plan easier when making the prototype. My group was confused when we didn't make the objective first but then everything went well after we decided the objective.
Week 5
Week 2
I find that making the objective first is making our plan easier when making the prototype. My group was confused when we didn't make the objective first but then everything went well after we decided the objective.
Week 5
Week 6-7
I find that trying on my own really helps me understanding the language. I start to understand the keywords and how to use them. I manage to make sure everything is working, including all the links and everything.
FURTHER READING
HTML & CSS Design and Build Website by Jon DuckettWeek 1-7 (07/10/19-14/10/19)
 |
| Fig 2.1 HTML & CSS DESIGN AND BUILD WEBSITE |
HTML has six "levels" of headings:
- <h1> is used for main headings
- <h2> is used for subheadings
- If there are further sections under the subheadings then the <h3> element is used, and so on


Comments
Post a Comment